
NAV Drone for Canadian RPAS Pilots (2026 Edition)
A Complete Flight Planning System for Transport Canada Advanced Operations
If you’re serious about operating under an Advanced RPAS certificate in Canada, mastering NAV Drone isn’t optional—it’s foundational.
This guide breaks down everything a professional drone pilot needs to know, not just how to use the app, but how to use it like a Transport Canada–compliant operator during a real flight review or commercial mission.
This is the exact level of understanding expected from Advanced UAV pilots.
What NAV Drone Actually Is (And Isn’t)
NAV Drone is developed by NAV CANADA, and it serves one primary purpose:
To provide airspace awareness and authorization for RPAS pilots in Canada.
What it DOES:
- Displays airspace classification (Class C, D, E, G)
- Shows aerodromes and control zones
- Allows authorization requests in controlled airspace
- Displays NOTAMs (Notices to Airmen)
- Indicates where you can legally fly
What it DOES NOT do:
- Provide full aviation weather (you must supplement)
- Replace pilot decision-making
- Plan your entire mission
Understanding this distinction is critical for both flight reviews and real-world operations.
Setting Up NAV Drone Properly (Most Pilots Skip This)
Before you even start planning a flight, your account setup matters.
Create Your Account
- Use your real identity (linked to your RPAS certificate)
- Ensure contact info is accurate (used for authorizations)
Register Your Aircraft
You must input:
- Drone make and model (e.g., DJI Mini 4 Pro)
- Weight category
- Serial number (optional but recommended)
Why this matters:
- Authorization requests are tied to your aircraft
- Reviewers expect you to know your aircraft category
Understanding Airspace Classification (Core Skill)
This is one of the most important competencies in advanced UAV operations.
NAV Drone visually displays:
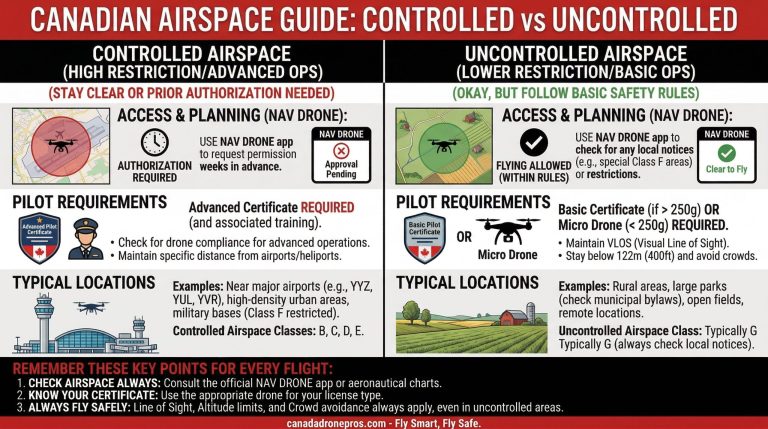
Class C (Controlled)
- Found around major airports
- Requires mandatory authorization
Class D (Controlled)
- Smaller controlled aerodromes
- Still requires authorization
Class E (Controlled at certain altitudes)
- Can be tricky—often overlooked
- May still require authorization depending on operation
Class G (Uncontrolled)
- No authorization required
- Still must follow all CARs
How to Identify Airspace in NAV Drone
- Open the map
- Tap your intended flight location
- Review:
- Airspace class
- Altitude limits
- Restrictions
4. Measuring Distance from Aerodromes
NAV Drone displays:
- Airports
- Heliports
- Seaplane bases
Why this matters:
Even in uncontrolled airspace, proximity to aerodromes increases risk.
Selecting the Correct Drone Operation
When planning a flight, NAV Drone requires you to select your operation type.
Options include:
- Basic operations
- Advanced operations
For Advanced pilots:
Always ensure:
- You are operating under Advanced rules
- Your mission aligns with:
- Controlled airspace operations
- Near people (if applicable)
Why this matters:
Selecting the wrong operation can:
- Lead to incorrect permissions
- Cause legal violations
Checking NOTAMs (Critical and Often Missed)
NOTAMs = Notices to Airmen
These include:
- Temporary flight restrictions
- Airspace closures
- Hazards (cranes, events, emergency operations)
How to Check NOTAMs in NAV Drone
- Select your flight area
- Tap the NOTAM layer or details panel
- Review all active notices
What a Strong Pilot Says
“I checked NOTAMs and confirmed no temporary restrictions affecting this operation.”
Most candidates skip this—and it’s one of the easiest ways to stand out.
Requesting Authorization (Step-by-Step)
This is the core function of NAV Drone for Advanced pilots.
When You Need Authorization
- Flying in Class C, D, or controlled airspace
- Near airports
- Within control zones
Authorization Process
Step 1: Select Flight Area
- Tap the location on map
- Define your operation zone
Step 2: Enter Flight Details
- Maximum altitude
- Time window
- Operation type
Step 3: Submit Request
- NAV Drone sends it to NAV CANADA
- You receive:
- Approval
- Conditions
- Restrictions
Important: Conditions Matter
Approval is NOT a free pass.
You must follow:
- Altitude limits
- Time restrictions
- Special instructions
Legal Requirements NAV Drone Helps You Meet
NAV Drone supports compliance with:
Transport Canada regulations
Including:
- Airspace authorization
- Safe distances
- Controlled airspace operations
But YOU are still responsible for:
- Visual Line of Sight (VLOS)
- Avoiding people and aircraft
- Weather compliance
- Emergency procedures
NAV Drone does NOT replace your legal responsibility.
Integrating NAV Drone Into Full Flight Planning
Professional pilots don’t use NAV Drone alone.
Here’s a complete workflow:
Step 1: Airspace Check
- NAV Drone → confirm classification and restrictions
Step 2: Authorization
- Submit request if required
Step 3: Weather
Use:
- NAV Canada Weather
- METAR / TAF
Step 4: Ground Risk
Use:
- Google Maps
- Identify:
- Roads
- People
- Obstacles
Step 5: Final Decision
Combine:
- Airspace
- Weather
- Risk
Common Mistakes Advanced Pilots Make
1. Relying only on NAV Drone
→ Missing weather risks
2. Not checking NOTAMs
→ Violating temporary restrictions
3. Misinterpreting airspace
→ Flying without authorization
4. Ignoring authorization conditions
→ Automatic failure in flight review
Advanced Tips That Separate Professionals
Use conservative buffers
Even if authorized to 400 ft:
- Fly lower if possible
Plan for failure
Ask:
- What if I lose signal?
- What if a helicopter appears?
Always cross-check
NAV Drone + weather + visual inspection
Speak your decisions
During a flight review, verbalizing your thought process is powerful.
Final Thoughts: NAV Drone for Canadian RPAS Pilots
NAV Drone is not just an app—it’s your interface with Canadian airspace.
If you:
- Understand airspace
- Use it properly for authorization
- Combine it with weather and risk assessment
Bottom Line
To succeed as an Advanced RPAS pilot in Canada:
- NAV Drone = Airspace + Legal Access
- Weather tools = Safety
- Your judgment = Everything
Master all three, and you’re operating at the level Transport Canada expects.